使用 Rollup + Typescript 来创建一个 npm 包

# 项目结构
.
├── CHANGELOG.md
├── LICENSE
├── README.md
├── commitlint.config.js
├── docs
│   ├── classes
│   └── modules.md
├── jest.config.js
├── lib
│   ├── index.cjs.js
│   └── index.esm.js
├── node_modules
├── package.json
├── rollup.config.js
├── src
│   ├── __tests__
│   └── index.ts
├── tsconfig.json
├── types
│   └── index.d.ts
└── yarn.lock
查看命令可以通过 tree -L 2 来查看...
# 开始动手
# 初始化 npm
快速初始化项目 npm init,选项根据提示进行填
# 创建 .nvmrc
v14.17.1
可以在 .zshrc 增加如下代码:
#  根据当前目录是否存在 nvmrc 启用对应 node 版本
load_nvmrc() {
	if [[ -f .nvmrc && -r .nvmrc ]]; then
		nvm use
	fi
}
因为 rollup-plugin-dts 需要 node 大于 v12.22.1
# 安装 rollup、@rollup/plugin-typescript、rollup-plugin-dts
yarn add rollup @rollup/plugin-typescript rollup-plugin-dts -D
这里我们使用 yarn 来进行yarn 和 npm 的差异 (opens new window),-D 表示只在开发环境中使用,
rollup: Rollup (opens new window) 是一个 JavaScript 模块打包器;@rollup/plugin-typescript: rollup 支持 ts 的插件 (opens new window),之前是用rollup-plugin-typescript,现在已经废弃了,改用@rollup/plugin-typescript这个了;rollup-plugin-dts:生成 d.ts 文件;
# 安装 Eslint 来约束代码风格
yarn add eslint @typescript-eslint/parser @typescript-eslint/eslint-plugin -D
yarn add eslint-config-airbnb-typescript eslint-config-prettier eslint-plugin-import -D
五个依赖分别是:
eslint:ESLint的核心代码;@typescript-eslint/parser:ESLint的解析器,用于解析typescript,从而检查和规范Typescript代码;@typescript-eslint/eslint-plugin:这是一个ESLint插件,包含了各类定义好的检测Typescript代码的规范;eslint-config-airbnb-typescript:代码规范,使 airbnb 规则适用于 ts;eslint-config-prettier:将会禁用掉所有那些非必须或者和prettier冲突的规则;eslint-plugin-import:用来支持 es5/es6+ 的 import/export 语法;
更多参考自:最全的Eslint配置模板,从此统一团队的编程习惯 (opens new window);
- 创建
.eslintignore忽略文件,内容如下:
*.js
# don't ever lint node_modules
node_modules
# don't lint build output (make sure it's set to your correct build folder name)
dist
es
lib
types
# don't lint nyc coverage output https://eslint.org/docs/developer-guide/development-environment
coverage
- 创建
.eslintrc.js配置文件,内容如下:
module.exports = {
  root: true,
  parser: '@typescript-eslint/parser',
  plugins: [
    '@typescript-eslint',
  ],
  extends: [
    'airbnb-typescript/base',
    'prettier',
    // 'prettier/@typescript-eslint': 已移除:https://github.com/prettier/eslint-config-prettier/blob/main/CHANGELOG.md#version-800-2021-02-21
  ],
  parserOptions: {
    project: './tsconfig.json', // TODO: 后续会创建
  },
};
- 创建
tsconfig.json配置,内容如下
{
  "compilerOptions": {
    "esModuleInterop": true,
    "target": "ES5",
    "importHelpers": true
  }
}
- 修改
package.json,增加如下代码:
"scripts": {
  "dev": "rollup -c -w",
  "lint": "eslint src --ext .ts", // --ext 检查指定代码块的文件扩展名
  "test": "yarn jest --detectOpenHandles --forceExit"
},
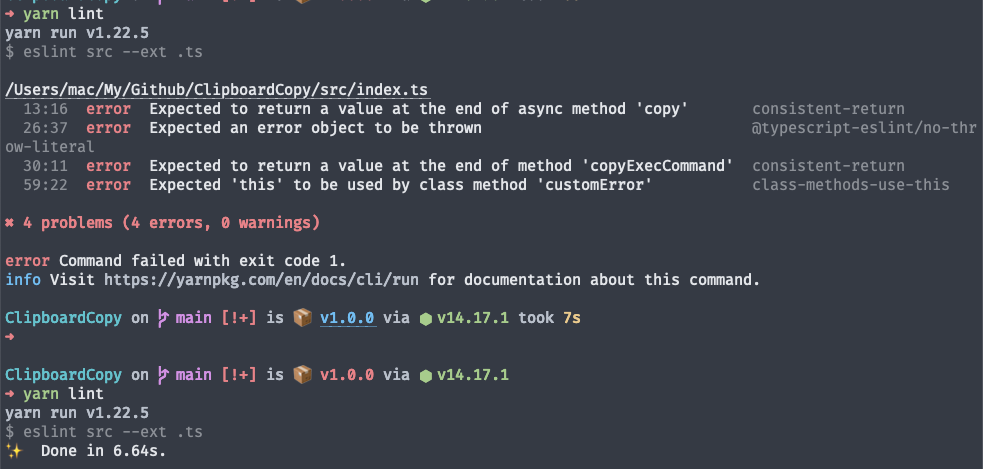
运行 yanr lint:输出如下:
# 安装 Typescript
yarn add typescript -D
# 创建 rollup.config.js
import typescript from '@rollup/plugin-typescript';
import dts from 'rollup-plugin-dts';

export default [
  {
    input: 'src/index.ts',
    output: [
      { format: 'cjs', file: 'lib/index.cjs.js', exports: 'named' },
      { format: 'es', file: 'lib/index.esm.js', exports: 'named' },
    ],
    plugins: [
      typescript({
        exclude: "**/__tests__/**"
      }),
    ],
  }, {
    input: 'src/index.ts',
    output: [{ dir: 'types', format: 'es' }],
    plugins: [
      dts({}),
    ],
  }
];
# 修改 package.json 文件
"description": "A simple clipboardcopy",
"scripts": {
    "dev": "rollup -c -w", // https://rollupjs.org/guide/en/#command-line-flags
  },
"repository": {
  ...
}
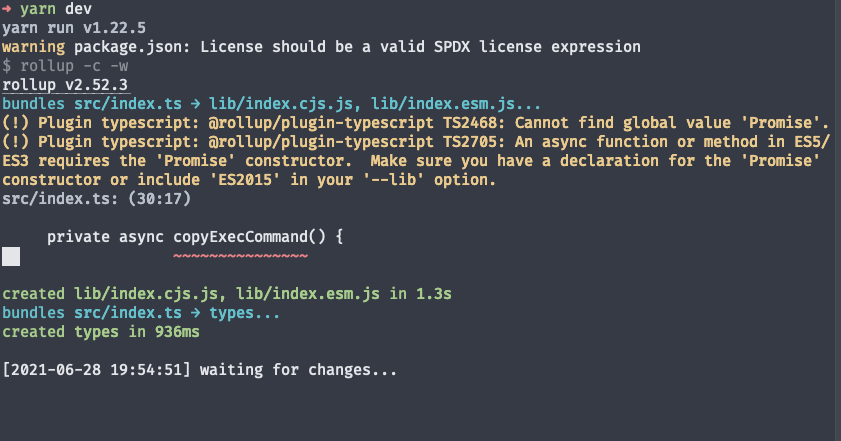
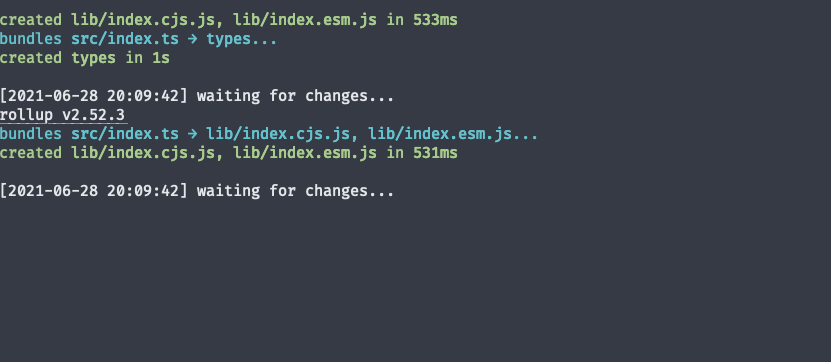
运行 yarn dev:
需要修改 tsconfig.json,增加如下内容:
"target": "ES5",
"lib": [
  "ES2015",
  "DOM"
],
"importHelpers": true
# 安装 jest 测试框架
yarn add jest ts-jest @types/jest -D

# 初始化配置文件
yarn ts-jest config:init
ts-jest @types/jest 是用来支持 ts 的,具体详见:ts-jest (opens new window);
jest.config.js: 配置内容如下:configuration (opens new window)
module.exports = {
  preset: 'ts-jest',
  testEnvironment: 'jsdom',
};
- 增加 测试 命令
// package.json
"description": "A simple clipboardcopy",
"scripts": {
    "dev": "rollup -c -w", // https://rollupjs.org/guide/en/#command-line-flags
    "test": "yarn jest --detectOpenHandles --forceExit" // https://jestjs.io/zh-Hans/docs/cli#--detectopenhandles
  },
"repository": {
  ...
}
- 增加测试文件
// copy.test.ts
/**
 * @jest-environment jsdom
 */
import ClipboardCopy from '../index';

test('ClipboardCopy is reject', () => {
  expect(new ClipboardCopy('tests').copy())
  .rejects.toThrow();
});
运行后显示如下:
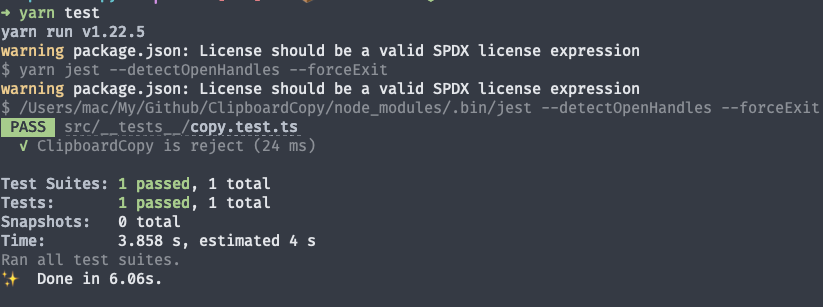
因为 jsdom 不能完全支持 浏览器功能,所以确定它是失败的;
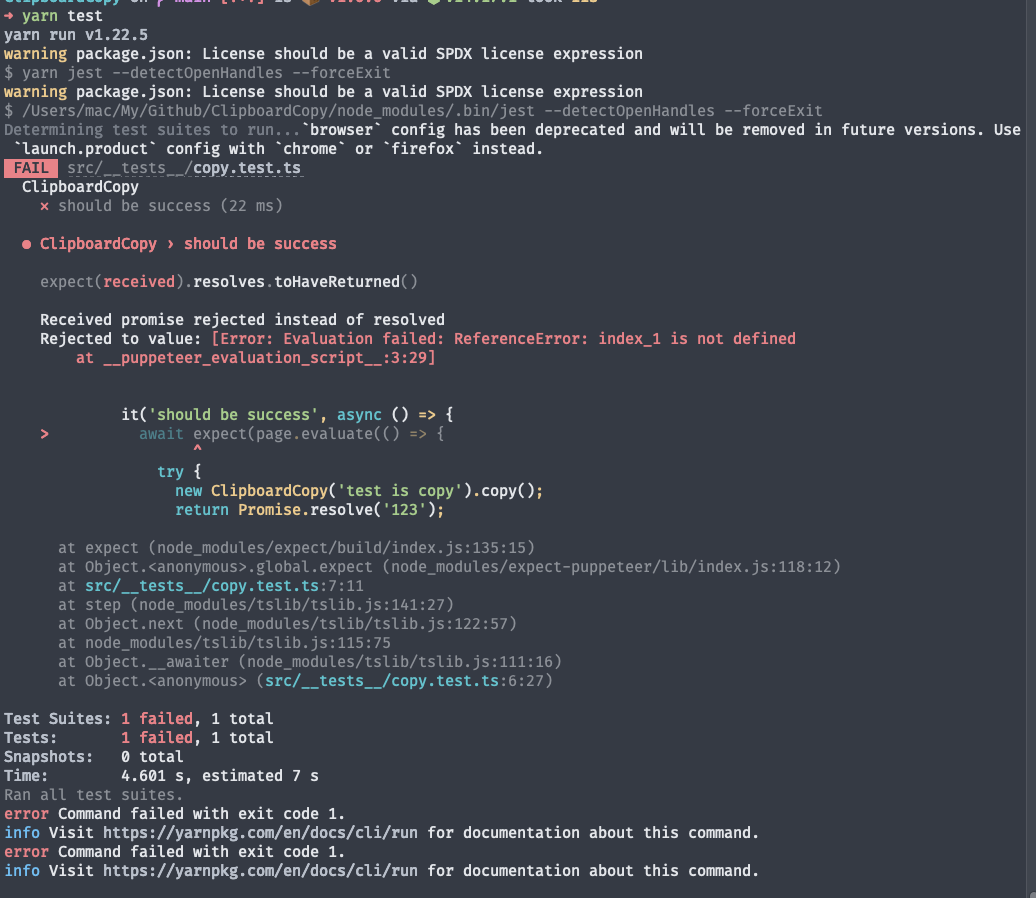
See More
以下内容运行不通过,后续更新
- 安装 jest-puppeteer 和 puppeteer,用来模拟在 浏览器环境
yarn add jest-puppeteer puppeteer @types/puppeteer -D
# TypeScript
yarn add @types/puppeteer @types/jest-environment-puppeteer @types/expect-puppeteer -D
需要把 jest.config.js 中 testEnvironment 改为 node,因为 puppeteer 是基于 node 来运行的,然后把 @jest-environment jsdom 删掉。
// jest.config.js
module.exports = {
  preset: 'jest-puppeteer',
  testEnvironment: 'node',
};
- 可以增加 jest-puppeteer.config.js 来配置 jest-puppeteer
module.exports = {
  launch: {
    headless: true,
    ignoreHTTPSErrors: true,
  },
  browser: 'chromium',
  browserContext: 'default',
}
- 在 jest.config.js 配置一下内容支持 es6 语法
module.exports = {
  preset: 'jest-puppeteer',
  transform: {"\\.ts$": ['ts-jest']},
  globals: {
    'ts-jest': {
      "tsconfig": "tsconfig.test.json"
    }
  },
};
// tsconfig.test.json
{
  "extends": "./tsconfig.json",
  // "compilerOptions": {
  //   "moduleResolution": "Node"
  // }
}
发现运行不通过,应该是 ts 和 es6 类 的原因导致的。。。
# 安装 rimraf
用来删除文件
yarn add rimraf -D
"scripts": {
  "dev": "rollup -c -w",
  "clean": "rimraf lib types",
  "lint": "eslint src --ext .ts",
  "test": "yarn jest --detectOpenHandles --forceExit"
},
运行 yarn clean,会看到 lib、types 文件夹删除
yarn clean
# yarn run v1.22.5
# $ rimraf es lib types
# ✨  Done in 0.32s.
# 增加命令 build 命令
"scripts": {
"dev": "rollup -c -w",
"clean": "rimraf lib types",
"lint": "eslint src --ext .ts",
"test": "yarn jest --detectOpenHandles --forceExit",
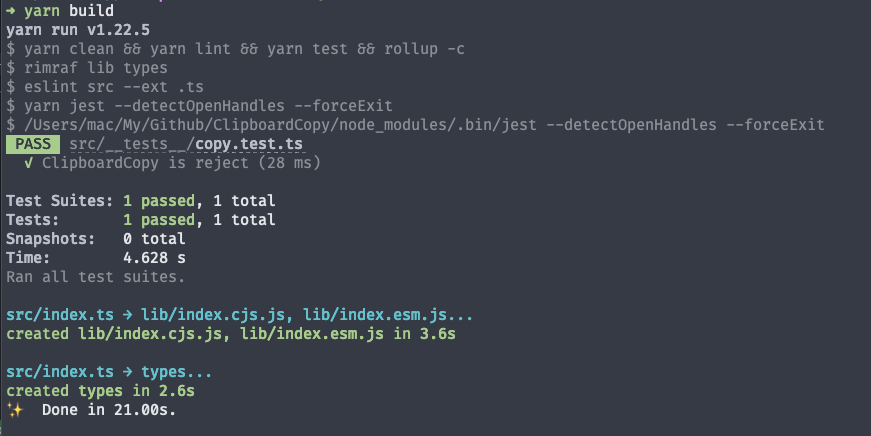
"build": "yarn clean && yarn lint && yarn test && rollup -c"
},
运行 yanr build 效果如下:
# 安装 typedoc 创建 文档
yarn add typedoc typedoc-plugin-markdown -D
- 配置命令
"scripts": {
    ...
    "test": "yarn jest  --detectOpenHandles --forceExit",
    "doc": "typedoc --excludeNotDocumented --plugin typedoc-plugin-markdown --out ./docs/ src/index.ts",
    "build": "yarn clean && yarn lint && yarn test && rollup -c "
  },
运行 yanr doc,输出如下:

更多 typedoc 配置:TypeDoc Documentation (opens new window)
# 修改 package.json
{
  ...,
  "main": "lib/math.cjs.js", // 定义了 npm 包的入口文件,browser 环境和 node 环境均可使用
  "module": "lib/math.esm.js", // 定义 npm 包的 ESM 规范的入口文件,browser 环境和 node 环境均可使用
  "typings": "types/index.d.ts", // ts 声明文件
  ...
   "publishConfig": { // 发布配置
    "registry": "https://registry.npmjs.org/"
  },
  ...
}
- 如果本机第一次发布包:(非第一次可忽略) 使用
npm adduser,根据提示输入账户、密码、邮箱。注:如果当前是 淘宝源 需要切换
# 淘宝源
npm config set registry http://registry.npm.taobao.org/
# 官方源
npm config set registry https://registry.npmjs.org/

npm adduser

# Username: xxxxxxx
# Password:
# Email: (this IS public) xxxxxxxxx.com
# Logged in as xxxxxx on https://registry.npmjs.org/.
- 非第一次发布包 再次使用
npm login步骤跟上面一样。 - 执行
npm publish发布,首次发布执行npm publish --access=public,如果想要撤回执行npm unpublish,不过推荐使用npm deprecate <pkg>[@<version>] <message>,这样别人在安装你的包时会得到提示。
# 安装一下 发布的包
可以看到安装成功了,但是有许多多余的包被发布了上去,可以修改一下:
- 增加 .npmignore 来忽略需要上传的文件
tsconfig.json
rollup.config.js
jest.config.js
docs/
.nvmrc
.eslintrc.js
.eslintignore
src/__tests__
可以看到 少了很多文件,nice~
# 增加自动生成 Changelog
yarn add conventional-changelog-cli husky -D
conventional-changelog-cli:生成 commit Changelog记录 (opens new window)husky:git hooks (opens new window),注:最新的 6.0 版本修改了 husky 的执行方式,具体查看:husky使用总结 (opens new window)用来检测 commit 信息规范
yarn add @commitlint/cli @commitlint/config-conventional -D
- 增加 commitlint.config.js 配置检测文件,内容如下:
module.exports = {
  extends: ['@commitlint/config-conventional']
}
修改 package.json
"scripts": {
  "prepare": "husky install",
  ...
  "version": "conventional-changelog -p angular -i CHANGELOG.md -s && git add CHANGELOG.md"
},
这样每次运行 version 的时候可以修改版本号并自动生成 CHANGELOG,注:运行 yarn version 的时候需要保证仓库是干净的,也就是没有 未提交 的修改。
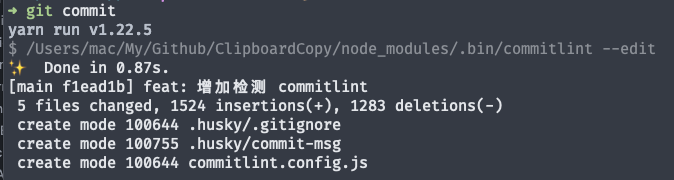
- 增加 husky: hooks (opens new window) 钩子:
# https://typicode.github.io/husky/#/?id=husky_git_params-ie-commitlint-
yarn husky add .husky/commit-msg "yarn commitlint --edit $1"
# 增加 Github Actions
- npm token 获取:creating-and-viewing-access-tokens (opens new window)
- 配置 NODE_AUTH_TOKEN:文档 (opens new window)
- 在 GitHub 上,导航到仓库的主页面。
- 在仓库名称下,单击 Settings(设置)。
- 在左侧边栏中,单击 Secrets(密码)。
- 在 "Name"(名称)输入框中输入密码的名称。
- 输入密码的值。
- 单击 Add secret(添加密码)。
# .github/workflows/publish.yml
name: publish
on:
  push:
    tags:
    - 'v*'  # 这段的意思是仅在出现名为 v 字符开头的tag时,触发此任务,如v1.2.1
jobs:
  publish:
    # needs: test
    runs-on: ubuntu-latest
    steps:
      - name: Checkout 🛎️
        uses: actions/checkout@v2
      - name: Setup-node
        uses: actions/setup-node@v2
        with:
          node-version: '14.x'
          registry-url: 'https://registry.npmjs.org'
      - name: Install and Build 🔧
        run: |
          npm install yarn
          yarn
          yarn build
      - name: Deploy 🚀
        run: npm publish
        env:
          NODE_AUTH_TOKEN: ${{ secrets.NPM_TOKEN }}
  github-release: # 设置自动生成Github Release
    needs: publish
    runs-on: ubuntu-latest
    steps:
      - name:  Checkout 🛎️
        uses: actions/checkout@v2
      - name:
        uses: actions/setup-node@v1
        with:
          node-version: '14.x'
          registry-url: https://registry.npmjs.org/
      - run: npm install yarn
      - run: npm i -g github-release-from-changelog
      - run: github-release-from-changelog
        env:
          GITHUB_TOKEN: ${{ secrets.GITHUB_TOKEN }} # 过程中会用到名为GITHUB_TOKEN的密钥,用于访问Github相关的API,不过这个私钥是Github Actions默认提供的,不需要额外设置。
注:git push origin :refs/tags/xxxxx 删除远程仓库 tag
这样每次进行 git push origin --tags 或者 推送某一次 git push origin vxx.xx.xx 到远程时会触发 Github Actions:
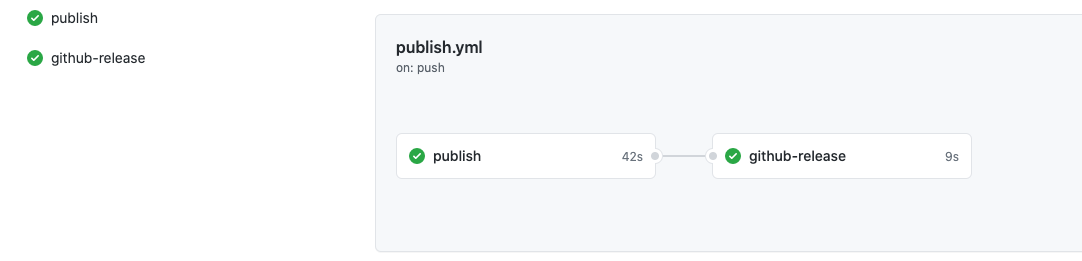
就会自动提交到 npm 仓库 并且 自动生成 Releases。